音楽プレイヤーについて
PCでMP3などの音楽を聴くときに、foobar2000というフリーソフトを使っている。スキンは、コチラの方のサイトのものをダウンロードさせて頂いて、foobar2000のwiki などを参考にしながら設定に少しだけ手を加えて遊んでみた。ここでは、foobar2000のインストールからスキンの導入までについてメモしておく。
foobar2000のインストールと必要なコンポーネントの導入
インストールに当たっては、foobar2000のwiki と、公式サイト より「Latest stable version」をダウンロードし、今回は「Portable版」でインストールした(フォルダの中にファイルが解凍されるので、これを任意の場所(~/Program Files (x86)/ など)に入れた)。
次に、スキンを設定するにあたり必要なコンポーネントをダウンロード。
– foo_ui_columns.dll:Columns UIのホームページ からダウンロードして解凍。
– foo_uie_elplaylist.dll: コチラのサイト らダウンロード。
– foo_uie_panel_splitter.dll: コチラのサイト からダウンロード。
– foo_uie_vis_channel_spectrum.dll:コチラのサイト からダウンロード。
– foo_uie_wsh_panel_mod.dll: Google Code Archive からダウンロード。
– foo_uie_graphical_browser.dll:foobar2000のwiki からダウンロードして解凍。
– foo_uie_albumlist.dll:Columns UIのホームページ からダウンロードして解凍。
– foo_uie_trackinfo_mod.dll: foobar2000のwiki からダウンロードして解凍。
– foo_uie_lyrics2.dll: foobar2000のwiki からダウンロードして解凍。
– foo_uie_lyrics_art.dll: foobar2000のwiki からダウンロードして解凍。
これらの10個のコンポーネントを、先のインストール(解凍)先フォルダの「components」の中に入れる。
また、スキン導入にあたり、冒頭の コチラ の方のサイトより、スキン(v0.1.1.2)をダウンロードさせて頂いた。ダウンロードしたファイルにある「skin_saitoh」フォルダの中の「images」フォルダと「skin.fcl」を、foobar2000をインストール(解凍)したフォルダにコピーする。
foobar2000の起動
まずfoobar2000を起動すると、「interface module」の選択ウィンドウが立ち上がるので、「Columns UI」を選択して「OK」をクリックして、まずはfoobar2000を起動する(以下はInterface moduleの選択ウィンドウと初期起動時の状態)。


最初に、foobar2000の「Library」→「Configure」から設定画面を開く。「Display」の「Lyrics Art」から「Main」タブにある画像のチェックを外し、フレームスタイルNoneにして「透明」にチェックを入れる。次に、同じく「Display」の「Columns UI」から「Main」タブにある「Show toolbars」のチェックを外し、「FCL importing and exporting」より「Import」をクリックして、先ほどの「skin.fcl」ファイルを読み込む。
Columns UIの設定
キーボードから「Ctrl」+「P」を押して「Preferences: Columns UI」を呼び出し、「Layout」タブを以下のように設定。
- Panel Stack Splitter
- - Artwork view
- - ELPlaylist
- - Buttons
- - Channel spectrum panel
- - WSH Panel Mod
- - WSH Panel Mod
※ 既存のパネルは残して、「Panel Stack Splitter」の上で右クリックして、「Insert Panel」→「Panel」から「Artwork view」を、「Toolbars」」から「Buttons」を挿入し、上記以外のパネルは削除した。
「Panel Stack Splitter」を選択して、「Configure」をクリックし「Splitter Settings」を設定する。

Splitter Settings の設定
以下に、各タブの設定を変更個所のみメモ。
「PanelList」タブ
Artwork view
Forced layout にチェック
left 30
Top 30
width $sub($muldiv(%_width%,35,100),40)
height $muldiv(%_height%,20,100)
ELPlaylist
※ Configure は、「ELPlaylist Settings の Configure」にメモ。
Forced layout にチェック
left $add(40,$muldiv(%_width%,35,100))
Top 30
width $sub(%_width%,$muldiv(%_width%,35,100),60,10)
height $sub(%_height%,130,50,-10)
Ignore panel size limits にチェック
Buttons
※ Configure は、「Buttons の Configure」にメモ。
Forced layout にチェック
Left 25
Top $sub(%_height%,80,30)
Width 330
Height 35
Ignore panel size limits にチェック
Channel spectrum panel
Forced layout にチェック
Left 2
Top $sub(%_height%,40)
Width $sub(%_width%,20)
Height 35
WSH Panel Mod (WSH_seekbarとなっている)
※ Configure は、「WSH_seekbar の Configure」にメモ。
Forced layout にチェック
Left 25
Top $sub(%_height%,63)
Width $sub(%_width%,50)
Height 8
Ignore panel size limits にチェック
WSH Panel Mod (WSH_bolumeとなっている)
※ Configure は、「WSH_bolume の Configure」にメモ。
Forced layout にチェック
Left $add(25,330,25)
Top $sub(%_height%,80,20)
Width $sub(%_width%,380,25)
Height 15
Ignore panel size limits にチェック
「Script」タブ
「Per Track」タブに以下のスクリプトを記述。
//スクリプトメモ
//$setparcentmode(bx,by,bw,bh) 0:絶対 1:相対
//$drawroundrect(x,y,w,h,w2,h2,R1-G1-B1-A1,R2-G2-B2-A2,RESERVED)
//Width : $sub(%_width%,750) は、横幅から750引いた数
//mulは掛け算、addは足し算、divは割り算
//$setparcentmode(1,1,1,1)$showpanel(0,1)
$showpanel(1,1)
$showpanel(2,1)
$showpanel(3,1)
$showpanel(4,1)
$showpanel(5,1)
$showpanel(6,1)//画像・detail枠
$drawroundrect(
10,10,
$muldiv(%_width%,35,100),$sub(%_height%,100,30),
25,25,
170-166-247-0,170-166-247-255,
)//playlist枠
$drawroundrect(
$add(20,$muldiv(%_width%,35,100)),10,
$sub(%_width%,$muldiv(%_width%,35,100),30),$sub(%_height%,100,30),
25,25,
170-166-247-0,170-166-247-255,
)//仕切り線1
$gradientrect(
20,$add(50,$muldiv(%_height%,20,100)),
$div($sub($muldiv(%_width%,35,100),20),2),1,
170-166-247-100,170-166-247-255,
horizontal
)
$gradientrect(
$add(20,$div($sub($muldiv(%_width%,35,100),20),2)),$add(50,$muldiv(%_height%,20,100)),
$div($sub($muldiv(%_width%,35,100),20),2),1,
170-166-247-255,170-166-247-100,
horizontal
)//仕切り線2
$gradientrect(
20,$sub(%_height%,41),
$sub($div(%_width%,2),10),1,
170-166-247-100,170-166-247-255,
horizontal
)
$gradientrect(
$add(10,$sub($div(%_width%,2),10)),$sub(%_height%,41),
$sub($div(%_width%,2),10),1,
170-166-247-255,170-166-247-100,
horizontal
)//detail表示
$put(detail.small.column,$div($sub(%_height%,181,$muldiv(%_height%,20,100),30),3))$font(メイリオ,9,)
$drawstring(%artist%,
30,$add($muldiv(%_height%,20,100),30,20,1,20),
$sub($muldiv(%_width%,35,100),40),$get(detail.small.column),
255-255-255,hcenter vcenter glow_aa mempos,
glow:4:64-124-192-222)$font(メイリオ,10,)
$drawstring(%title%,
30,$add($muldiv(%_height%,20,100),30,20,1,20,$get(detail.small.column)),
$sub($muldiv(%_width%,35,100),40),$get(detail.small.column),
255-255-255,hcenter vcenter glow_aa mempos,
glow:4:64-124-192-222)$font(メイリオ,9,)
$drawstring(%album%,
30,$add($muldiv(%_height%,20,100),30,20,1,20,$mul($get(detail.small.column),2)),
$sub($muldiv(%_width%,35,100),40),$get(detail.small.column),
255-255-255,hcenter vcenter glow_aa mempos,
glow:4:64-124-192-222)
なお、ここでは「Per Second」タブは行頭に「//」を追加して全てコメントアウトした。
「Behaviour」タブ
以下のように設定。

ELPlaylistのConfigure
「Script」タブ
Track list
以下のスクリプトを記述。
///////Track Info///////
$font(メイリオ,10,)
$setcoordinate(1) //x,y,r,b mode
$if($not(%el_isplaying%),$drawtextex(%title%,
10,0,
$muldiv(%el_width%,80,100),%el_height%,
210-210-254,vcenter end_ellipsis
)$setcoordinate(0) //x,y,w,h mode
$drawtext(%length%,
0,0,
$sub(%el_width%,4),%el_height%,
210-210-254,vcenter right),)
///////BG Colour///////
$setcoordinate(0)
$if($not(%el_is_themed%),
$if(%el_selected%,
$gradientrect(0,0,%el_width%,%el_height%,
190-190-255-60,80-80-220-60,nonlinear aa,20),
),
)
Group header
全てコメントアウト(削除)。
Per Second
以下のスクリプトを記述。
///////Track Info///////
$put(LEN,$add(30,$gettextwidth(%playback_time%),$gettextwidth(%length%)))$font(メイリオ,10,)
$setcoordinate(1) //x,y,r,b mode
$drawtextex(%title%,
10,0,
$sub(%el_width%,$get(LEN)),%el_height%,
230-230-255,vcenter end_ellipsis aa
)$setcoordinate(0) //x,y,w,h mode
$drawtext(%playback_time% / %length%,
0,0,
%el_width%,%el_height%,
230-230-255,vcenter right)///////BG Colour///////
$setcoordinate(0)
$if($not(%el_is_themed%),
$if(%el_isplaying%,
$gradientrect(0,0,%el_width%,%el_height%,
190-190-255-100,80-80-220-100,nonlinear aa,20),
),
)
Pupup(Background)
以下のスクリプトを記述。
//////POPUP Size//////
$ifequal(%el_item_count%,1
,$popupsize(%el_width%,240),$popupsize(%el_width%,$mul($add($ifgreater(%el_item_count%,%el_item_count2%,2,1),%el_item_count2%),20))
)//////BG Colour//////
$fillroundrect(,,$sub(%el_width%,1),$sub(%el_popup_height%,1),10,10,92-92-92,92-92-92)$ifequal(%__GROUPING__%,1,,
$imageabs($sub(%el_width%,110),$sub(%el_popup_height%,110),100,100,%__ART_PATH__%,,)
)//////Extra//////
$ifgreater(%el_item_count%,%el_item_count2%
,$drawstring(‘(‘%el_item_count2%/%el_item_count%’)’,10,$add(12,$mul(%el_item_count2%,20)),%el_width%,%el_height%,255-255-255,nowrap elipchar)
,
)
Pupup(Track)
以下のスクリプトを記述。
/////Popup Script////
$setcoordinate(1)//////Track Info/////
$font(メイリオ,9,) $drawstring([%tracknumber%. ]%title%[ ~ %song_version%],10,$add(12,$mul(%el_item_index%,20)),%el_width%,%el_height%,255-255-255,nowrap elipchar)
$font(メイリオ,8,) $drawstring(
$if2(%album%,Unkown Album)[ – %date%]$crlf()$if2(%artist%,Unknown Artist)$crlf()
$crlf()
[Playcount: %play_counter%$crlf()][Created date : $date(%created%)$crlf()][Last Played : $date(%last_played%)$crlf()]
$crlf()
%codec% – %bitrate% kbps
,10,38,%el_width%,%el_height%,192-192-192,nowrap elipchar)
「Style」タブ
以下のように設定。

「Grouping」タブ
以下のように設定。

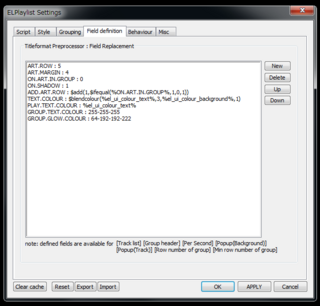
「Field definition」タブ
以下のように設定。
「Behaviour」タブ
以下のように設定。

「Misc」タブ
以下のように設定。

ButtonsのConfigure
上から順に、以下のように設定。
・View/Playlist Manager
・- separator
・Playback/Stop
・Playback/Play
・Playback/Previous
・Playback/Next
・Playback/Pause
・-Separator
・File/Open
・File/Preferences
それぞれのボタンにNormal imageとHot imageを割り当てるが、最初にコピーした「images」フォルダの中の「button」フォルダに大きいサイズのボタンしかないため、「big_mode」のフォルダの中から上のボタンに割り当てるものを「button」フォルダにコピーし、右クリック→編集(ペイント)から「サイズ変更」にてピクセル単位で30×30とした。割り当ては、「Image:」を「Custom」として、「Browse」からサイズを小さくしたボタンを選択する。
WSH_seekbarのConfigure
以下のスクリプトを記述。
// GDI seekbar script for Foobar2000 WSH Panel Mod by tsybko
function RGB(r, g, b) {
return (0xff000000 | (r << 16) | (g << 8) | (b));
}var seekbarFont = gdi.Font(“Arial Black”, 12, 0);
var shouldBeDragged = 0;var color = {
activeBarTop: RGB(255, 255, 255),
activeBarMiddle: RGB(70, 70, 255),
activeBarBottom: RGB(255, 255, 255),
frame: 0xFFCCCCCC,
inactiveBarTop: RGB( 240, 240, 240 ),
inactiveBarBottom: RGB( 100, 100, 100 ),
textFront: 0xFFFFFFFF,
textBack: 0xFF000000
};var padWithZero = function(number) {
return number < 10 ? "0" + number : number;
};function on_paint(e){
e.SetTextRenderingHint(5);
var ww = window.Width;
var wh = window.Height;
var pos = window.width * fb.PlaybackTime / (fb.PlaybackLength == 0 ? 1 : fb.PlaybackLength);
var minutes = Math.floor(fb.PlaybackTime / 60);
var seconds = Math.floor(fb.PlaybackTime % 60);
var shouldColonize = seconds % 2;
var text = padWithZero(minutes) + (shouldColonize ? ” : ” : ” “) + padWithZero(seconds);
var thirdHeight = wh / 3;
// Draw the active bar
e.FillGradRect(0, 0, pos, thirdHeight, 90, color.activeBarTop, color.activeBarMiddle);
e.FillGradRect(0, thirdHeight, pos, thirdHeight, 90, color.activeBarMiddle, color.activeBarMiddle);
e.FillGradRect(0, thirdHeight + thirdHeight, pos, thirdHeight, 90, color.activeBarMiddle, color.activeBarBottom);
// Draw the passive background bar
e.FillGradRect(pos, 0, ww-pos, wh, 90, color.inactiveBarTop, color.inactiveBarBottom);
// Draw the frame
e.DrawRect(0,0, ww-1, wh-1, 1.0, color.frame);
// Draw the seek text
//e.DrawString(text, seekbarFont, color.textBack, 0, 0, ww + 2, wh + 1, 0x11205000);
//e.DrawString(text, seekbarFont, color.textFront, 0, 0, ww, wh – 1, 0x11005000);
}function on_mouse_lbtn_down(x, y) {
shouldBeDragged = 1;
}function on_mouse_lbtn_up(x, y) {
on_mouse_move(x,y);
shouldBeDragged = 0;
}function on_mouse_move(x, y) {
if ( shouldBeDragged ) {
var v = x / window.Width;
fb.PlaybackTime = v * fb.PlaybackLength
}
}function on_playback_seek() {
window.Repaint();
}function on_playback_time() {
window.Repaint();
}function on_playback_stop() {
window.Repaint();
}//EOF
WSH_volumeのConfigure
「Edge style」をGreyにして、以下のスクリプトを記述。
// vi:set ft=javascript ff=dos ts=4 sts=4 sw=4 et:
function RGB(r, g, b) {
return (0xff000000 | (r << 16) | (g << 8) | (b));
}// gdi.Font is changed, the last paramter is style flags
// FontStyleRegular = 0,
// FontStyleBold = 1,
// FontStyleItalic = 2,
// FontStyleBoldItalic = 3,
// FontStyleUnderline = 4,
// FontStyleStrikeout = 8
// Here is 0, means FontStyleRegular
var g_font = gdi.Font(“Tahoma”, 12, 0);
var g_drag = 0;function on_paint(gr) {
gr.SetTextRenderingHint(5);
var ww = window.Width;
var wh = window.Height;
var volume = fb.Volume;
var pos = window.Width * ((100 + volume) / 100);
var txt = (Math.ceil(volume)) + “dB”;
// gr.FillGradRect(0, 0, pos, wh, 90, RGB(240, 240, 240), RGB(100, 230, 100));
gr.FillGradRect(0, 0, pos, wh, 90, RGB(255, 255, 255), RGB(70, 70, 255));
// gr.FillGradRect(pos, 0, ww – pos, wh, 90, RGB(240, 240, 240), RGB(190, 190, 190));
gr.FillGradRect(pos, 0, ww – pos, wh, 90, RGB(255, 255, 255), RGB(0, 0, 0));
gr.DrawString(txt, g_font, RGB(64, 64, 128), 0, 0, ww, wh, 0x11005000);
// gr.DrawRect(0, 0, ww – 1, wh – 1, 1.0, RGB(150, 150, 150));
gr.DrawRect(0, 0, ww – 1, wh – 1, 1.0, RGB(70, 70, 255));
}function on_mouse_lbtn_down(x, y) {
g_drag = 1;
}function on_mouse_lbtn_up(x, y) {
on_mouse_move(x, y);
g_drag = 0;
}function on_mouse_move(x, y) {
if (g_drag) {
var v = x / window.Width;
v = (v < 0) ? 0 : (v < 1) ? v : 1; v = -100 * (1 - v); if (fb.Volume != v) fb.Volume = v; } } function on_mouse_wheel(delta) { if (delta > 0) fb.VolumeUp();
else fb.VolumeDown();
}function on_volume_change(val) {
window.Repaint();
}
その他の設定など
Colour設定
Artwork viewの背景が白くなったりするので、以下のように設定。

Channel spectrum panelの設定
パネルの上で右クリックして「Config」を以下のように設定。

タイトルバーの変更
foobar2000のwiki から、UI Hacks をダウンロード。解凍して、「foo_ui_hacks.dll」をfoobar2000の「components」フォルダに入れる。再起動して「Ctrl+P」からPreferencesを開くと、「Default User Interface」に「Main Windows」が追加表示されているので、「Caption style」から「Small」を選択(Hiddenにするとタイトルバーが消えるが、移動が面倒なのでSmallにした)。同じくPreferencesの「Columns UI」で、「Main windows title format script」を、『 [%title%] 』だけにして、タイトルバーの表示をすっきりさせた。
おわりに
以下は一通り設定を終えたスキン。
(設定完了)

(ウィンドウサイズを変更させた時)

ノートPCなどで起動する際にウィンドウを小さくしてもあまり違和感がないように、スキンの設定では表示するフォントを少し小さくして、各パネルの設定を相対位置で記述している(この位置の指定を決めるのに、昔、何度も試行錯誤して苦労した記憶がある)。今回はこのメモに残すために再度インストールからやり直したが、インストールをPortable版にしたので、フォルダごと別のPCにコピーすれば起動できるのは便利だと思った。残念なことは、ダウンロードさせて頂いた元のスキンにはせっかく色々と設定してあったのに、自分の勉強不足で機能を必要最小限に設定して消してしまったスクリプトが多いことである。また時間を見つけたらスキンをいじって遊んでみたい。
参考
上記までの設定をExportしたファイル ojamemo.rev0.fcl を、参考までに保存しておく。
(PCの前では、この”foobar2000″を使っているが、通勤時などはMP3プレイヤーを使っている。もう何年も使っているのだが、今は新しく買ってもそれほど高くない(楽天市場での「MP3プレイヤー」の検索結果![]() )ので、携帯用の音楽プレイヤーも近いうちに買い換えたいと思う。)
)ので、携帯用の音楽プレイヤーも近いうちに買い換えたいと思う。)
スポンサーリンク